Going Deeper
Written by Guillotine - All mods in the link are made using this technique.
Last updated: [26/12/24]
Difficulty: Intermediate
Welcome back, let's dive deeper and I will give you more ideas on what is possible. In this section, I expect that you understand the concept and basics in the first guide on UAssetGUI. If you're ready, let's do this!
Programs you will need to follow along with this guide apart from the ones used in the first guide:
-
For following along on the
Step 3. Add functionality to existing items- VSCode - Don't worry, we're not writing any code for this guide, I will just show you some tricks that we can use. -
Before heading into
Step 3. Add functionality to existing itemsyou need to follow theinstall UE4SS to your game,Breakdown - Dumperspart and also theVSCodesection ofAdd CXXHeaderDump to Workspacefound on this page
Step 1. Add more sell offers to merchants
Let's start by showing you how you can add more items to the merchants, this will teach you the basics of the technique we will use for the future guides.
First I want you to export DT_ItemShopCreateData_Common, either by going to Pal>Content>Pal>Datatable>ItemShop or at the top left, go Packages>Search and type what we want to find, in this case ItemShopCreateData.
- NOTE: Again, if your file has a
_Commonvariant, make sure you edit that file and not the one without_Common
Now open that file with UAssetGUI and go over to Village_Shop / ProductDataArray and scroll all the way down on the right side, you can see that we have 37 rows of "Variant" PalItemShopCreateDataStruct so let's add a new line here.
Click the PalItemShopCreateDataStruct ONCE and copy + paste it to the next row and change the number to 38.
save and open the file again to update it.
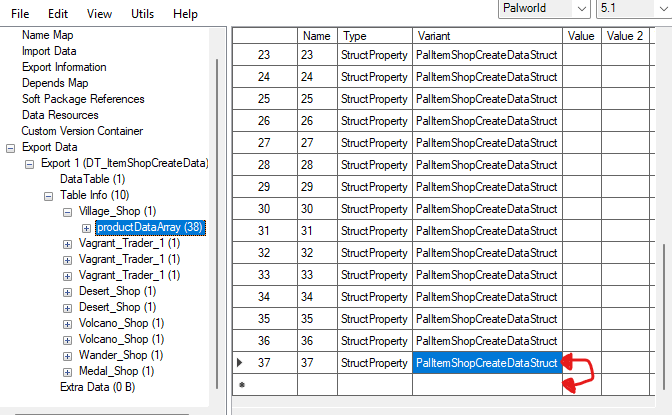
Now when you go back to Village_Shop / ProductDataArray and scroll down on the left side you can see that we now have a row called 38 that we can do whatever we want with so let's do something with it.

Let's add Dog Coins, the ItemID for it is DogCoin so enter that at the top row of StaticItemId instead of PalItem_ToSell_05
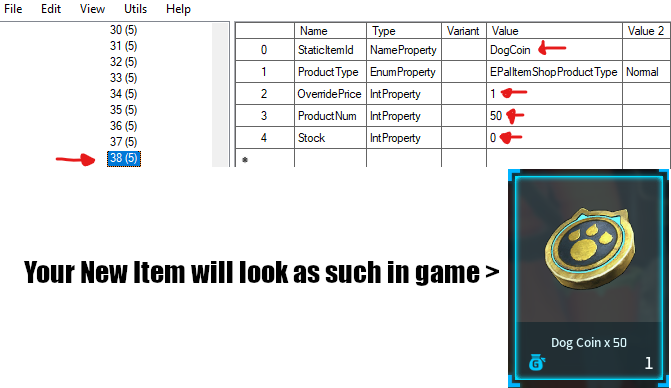
Now you have 5 different properties to play around with and I will explain them in short
- StaticItemId = the items static item ID > you can find them here
- ProductType = This will be explained in the
Step 3. Add functionality to existing itemssection, come back later. - OverridePrice = The price you want the item to cost in the
Coincurrency - ProductNum = How many of this item will be sold in bulk
- Stock =
-1 = not visible in shop.-0 = Infinite amount.-1 or highermeans that the merchant has a max amount of this item and stock, resets after one in game day.
Congratulations, you can now buy 50x Dog Coins for 1 coin at the Small Settlement merchant, install the mod and open up the game to see if it worked.
Save this mod folder for when you come back after reading Step 3. Add functionality to existing items
- Hint if you're coming back from
Step 3and need further guidance, search forEPalItemShopProductTypein vscode and you see we can change"Normal"to"OnlyPurchaseOne"on the"ProductType"category, this means a player can only buy this itemone timein their full play through in your world, just like the jewelry slot items at theMedal Merchant.
Step 2. Add recipes
Now that you understand how to create new rows in a datatable, let's move onto adding new recipes and you will see how some files behave when trying to add new rows and how to combat it.
I want you to export DT_ItemRecipeDataTable_Common again, if you still have the mod folder from the first guide page, you can use that if you want.
Now, I want you to open up 2 instances of UAssetGUI and have them next to eachother, open the same Recipe file on both windows
Decide which window will be your editing window, i will use the left one.
Go to Table Info, scroll all the way down and copy the line HeadEquip023 onto row 591 to make a new line just like before, let's make a recipe for Air Cannon skill fruit, so name it Air Cannon or something similar, doesn't matter too much here.
Save & Re-Open the file on the editor window
Now that you scroll down, you will notice that your new line "Air Cannon" has nothing in it, so go to your 2nd UAssetGUI window and open any item row, for example the PalSphere.
We now have to copy over the data from the PalSphere window over to our new Air Cannon window, so start copying each row one by one (I know it's a bit tedious but hey, it's for the greater good) Make sure to save after you've transferred all 18 lines over. (it starts at 0 so total lines are 18, don't be confused about it saying 17)
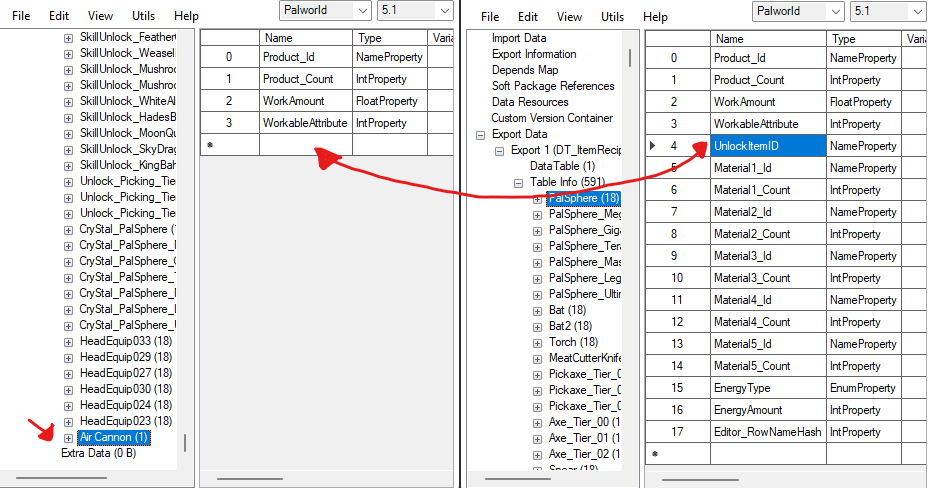
Now we just need to decide what our recipe will look like, so since we're making a recipe for Air Cannon we need the Item ID SkillCard_AirCanon and for the sake of the guide we will just leave the rest of the lines as they are
Congratulations, you've made a recipe, but wait.. There's no crafting table assigned to crafting skill fruits so we can't actually craft it anywhere.
Let's add that functionality to the Pal Gear Workbench in the next step.
Step 3. Add functionality to existing items
This guide will start introducing you a bit to blueprint editing, which can be tricky at some parts and sometimes it just won't let us do what we want, but I will show you a little of what we can do.
- Note: When working with blueprints, they will sometimes not allow us to open them and give us an error message, to combat this, I want you to export the whole
blueprint folderas many files depend on the whole folder structure to be intact to allow us to even open the files, sometimes it will even tell us which file is missing and you can add that file to yourblueprint folder. Store the folder wherever you want for future use.
Now that you have a blueprint folder that you can work with, go ahead and also export BP_BuildObject_WorkBench_SkillUnlock and store it in a new mod folder for now.
Now, open UAssetGUI again and go into your Blueprints folder and locate this same file in Pal>Content>Pal>Blueprint>MapObject>BuildObject (It's almost at the bottom)
Open Export Data > Export 9 (ItemConverterParameter) > PalMapObjectItemConverterParameterComponent This is the part where it can get tricky so bear with me.
- If you didn't do the VSCode installation at the top of this page, now is the time to do it.
Ok, let's do this, open up VSCode, right click CXXHeaderDump and then Find In Folder. Now I want you to search for PalMapObjectItemConverterParameter and click what comes up in the search class PalMapObjectItemConverterParameter
- We're going to go a bit off track here quickly for the sake of explaining how we can implement extra functionality that didn't exist on the items previously.
Here you see 7 different settings that we can choose to import to our WorkBench_SkillUnlock but if you noticed in UAssetGUI we only have 3 of these settings
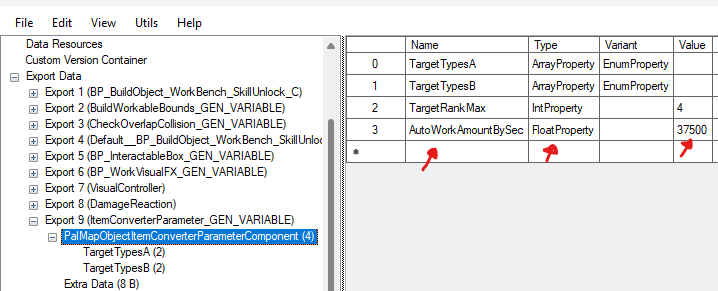
So let's start with importing AutoWorkAmountBySec so make a new line by copying TargetRankMax onto the next line, just like we've done in the previous steps.
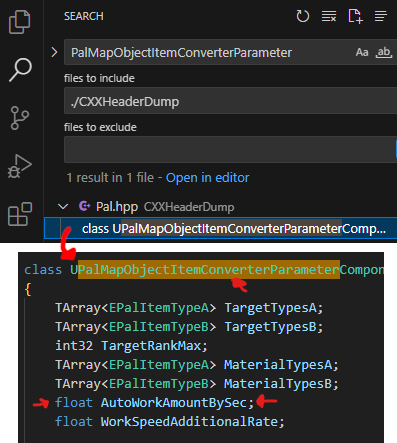
Now you also have to look at VSCode, next to AutoWorkAmountBySec we see it says float, that is important as we have to change the type on our new row from IntProperty to FloatProperty and now you can put any number value you want here, voila we now have an Automatic Pal Gear Workbench.
- Ok, let's get back to what we were doing.
Let's talk about the ArrayProperty of TargetTypesA/B for crafting stations, these decide what items can be crafted on any specific table so in UAssetGUI, click on TargetTypesA on the left side to start with. You can see that it has a value of EPalItemTypeA::Essential so let's go back to VSCode and make a new search for EPalItemTypeA to see what comes up in that Array.
Go to the first search result of enum class EPalItemTypeA and you will see alot of different options that we can add to our table.
But to make it even easier on you, scroll down and you will see enum class EPalItemTypeB below our first search result. Here it's specified a bit better, Skills in this game are called Waza in the game files and if you saw the option of ConsumeWazaMachine then good job! Now we know our types are Type A = Consume and Type B = ConsumeWazaMachine
Let's go back and add a new row on Type A = EPalItemTypeA::Consume and for Type B = EPalItemTypeB::ConsumeWazaMachine

Congratulations, you can now craft skill fruits on the pal gear work bench, but wait, we were not working in our mod folder, we have been editing in the Blueprint folder, remember?
So let's open up 2 folder windows, one with our mod folder and one with the blueprint folder
Go all the way into your mod folder until you find the files of BP_BuildObject_WorkBench_SkillUnlock
Now locate the same files in the blueprint folder and copy all 4 files and replace the 2 that are in your mod folder (edited files always come as 4 files)
- Note: The reason I say
copyis because you maybe want to make further edits to your files and if they're no longer in the blueprint folder, you may not be able to open them without putting them back in theblueprint folderfirst.
Now you're ready to try your mod out so .pak up both your recipe mod and your workbench mod (make sure they end with _P) and install them to your game.
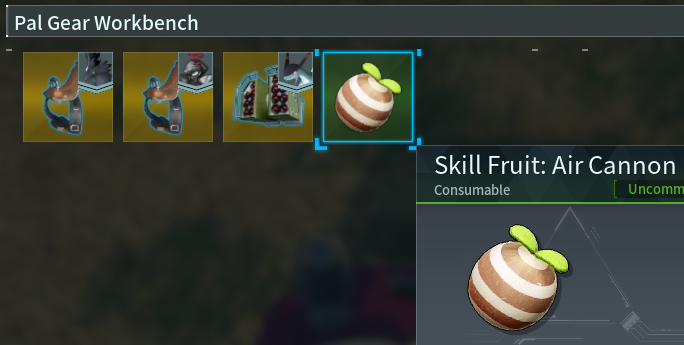
If all went well, you should be able to craft Air Cannon Skill Fruit on the Pal Gear Workbench now, good job!
- As a last step, you may now
use your new knowledgeand try to figure out what you can do with theProduct Typeover at the merchants in Step 1.
Step 4. Combine your mod folders.
Before you upload your new mod, you may want to combine them so you don't upload 2 different mod files
To do this, remember that the folder structure is very important for the mods to work.
What I do is open 2 folder windows and go folder by folder until I find the point where they split, so in this case we would find that at Pal > Content > Pal they split so we have one folder called Blueprint and one is called DataTable copy one or the other over and choose an appropriate name for your mod.
Finishing Notes
Important side-note: Make sure you test your mods before uploading them so that you know your mod has the full intended functionality.
Congratulations, you've reached the end of the guide!
If you have any questions, feel free to message me and if you haven't yet, join our community over at the modding discord we're more than happy to help with whatever you need help with.
Good luck
Guillotine