Kawaii Physics for Player Model Swaps
Using Unreal Editors Compatible Skeletons to add Custom Bones and apply physics to them
- Written by:
ReapersVigilance
![]()
Overview
This guide is to show how to setup your model with UE's compatible skeletons to activate Kawaii physics and collision. FOR CUSTOM ADDED BONES
I am assuming you understand the concept and setup of model swapping including the extraction from FModel, Importing to Blender, Weight painting, and Export from Blender. I will touch on them briefly however. Other guides are quite detailed in doing all of the above.
I'm going to Write this as a full Model Swap however it can be done with just Hair/Head Models as long as you use a dummy SK_PalHuman_Skeleton in the proper folder.
process is very similar to a normal model swap except for some key differences in the Exporting from blender and UE work.
Critical Notes
- This method works for adding physics to CUSTOM BONES in both Hair and Head Swaps. It does NOT work for adding physics bones to Outfit swaps. (Unless you like T-posing everywhere)So it works best doing them all together and choosing which Kawaii parts will be Hair and which will be Head.
- Can be done using only Hair swap or only Head swap for the Kawaii Items if preferred.
- As long as you're adding physics to Default Bones on an Outfit, that'll work without the Compatible Skeletons. Can skip right to the Kawaii section for that.
This is absolutely not a replacement for the bone reorder and animation tool by Shifty
It just allows you to add physics to swaps without breaking the animations.
Can be used in combination with Jiggle Physics (18+) guide by Dytser
Tools Needed
- FModel; Allows you to extract, view, and find files from the game
- Updated Mapping file for Palworld
- Can be found on the Palworld Modding Community Discord
- Updated Mapping file for Palworld
- Blender; 3D Modeling Software
- psk/psa importer
- Unreal Engine 5.1.1
- Kawaii Physics Plugin 1.10; Physics Simulation Addon for UE used by the game
- Specific version ~ KawaiiPhysics_5_1_20221203.zip
- UnrealPak; For compiling into game readable pak files
- Can be found on the Palworld Modding Community Discord
Preview
See Gif 01 for a brief preview of what this guide accomplishes
| Reference File Name/Description | Reference File |
|---|---|
Gif 01 - Preview A preview of what will be done using this guide The Body/Arms/Legs/Head are an Outfit Swap Note that the objects included in the |
|
![]()
Full Process
Step 1 _ (FModel and Blender) - File Prep
- Standard Model Swap process to begin
- The Psk you will need to Export from FModel is the
SK_Player_Femalefrom the pathPal/Content/Pal/Model/Character/Player/Body/Femalethis comes with the SK_PalHuman_Skeleton we need- can be done with one of the outfit skeletons as well as they reference the same.
- The Psk you will need to Export from FModel is the
- Import this psk into blender along with the model you will be swapping.
SEE IMAGE 01 - From here is the same as a normal model swap with aligning your model and applying your model to the game skeleton.
| Reference File Name/Description | Reference File |
|---|---|
Image_01 - Default A preview of what will be done using this guide The Body/Arms/Legs/Head are an Outfit Swap Note that the objects included in the |
|
Step 2 _ (Blender) - Add Bones and Painting
- You can now add bones to the skeleton that will reference any part you want Kawaii Physics
- Hair, Tail, Ears, Dangling parts, Whatever
- Have the last bone of these parts off of the model. It helps for the physics later.
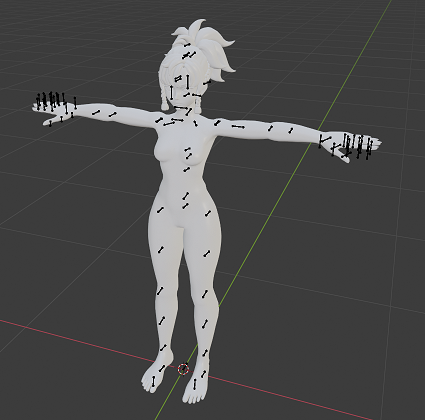
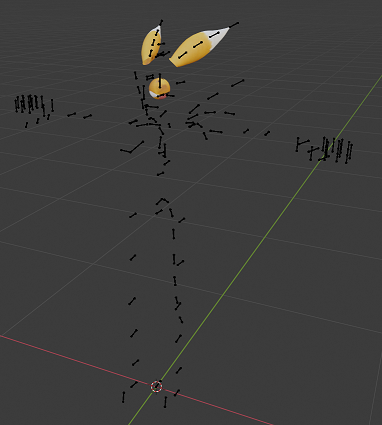
SEE IMAGE 02 - ENSURE THESE BONES ATTACH TO OTHER BONES
- Example: parent the first bone of a hair chain to the head bone,
or parent the first tail bone to the spine_01 bone.
- Example: parent the first bone of a hair chain to the head bone,
- Weight paint.
- Whether you do it manually or use Mesh Data Transfer from the original game model.
Tweak as necessary for your new bones. - That last bone thats slightly hanging off will need to influence the very tip of whatever part its attached it.
- Whether you do it manually or use Mesh Data Transfer from the original game model.
| Reference File Name/Description | Reference File |
|---|---|
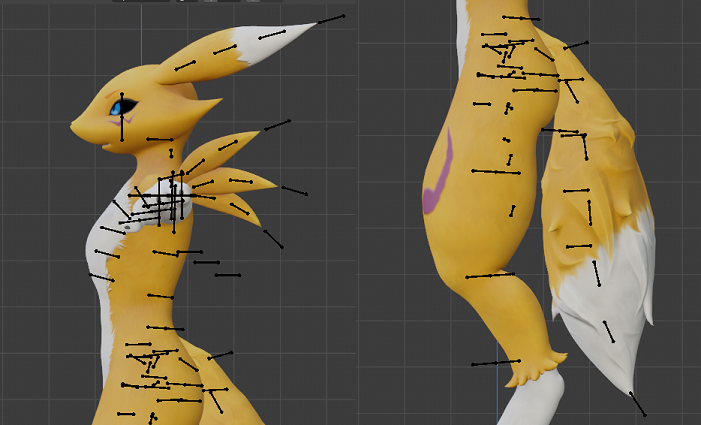
Image_02 - Custom Bones An example of Custom added bones The 4 bone chain for the ears The 3 bone chains for each spike The 7 bone chain for the tail |
|

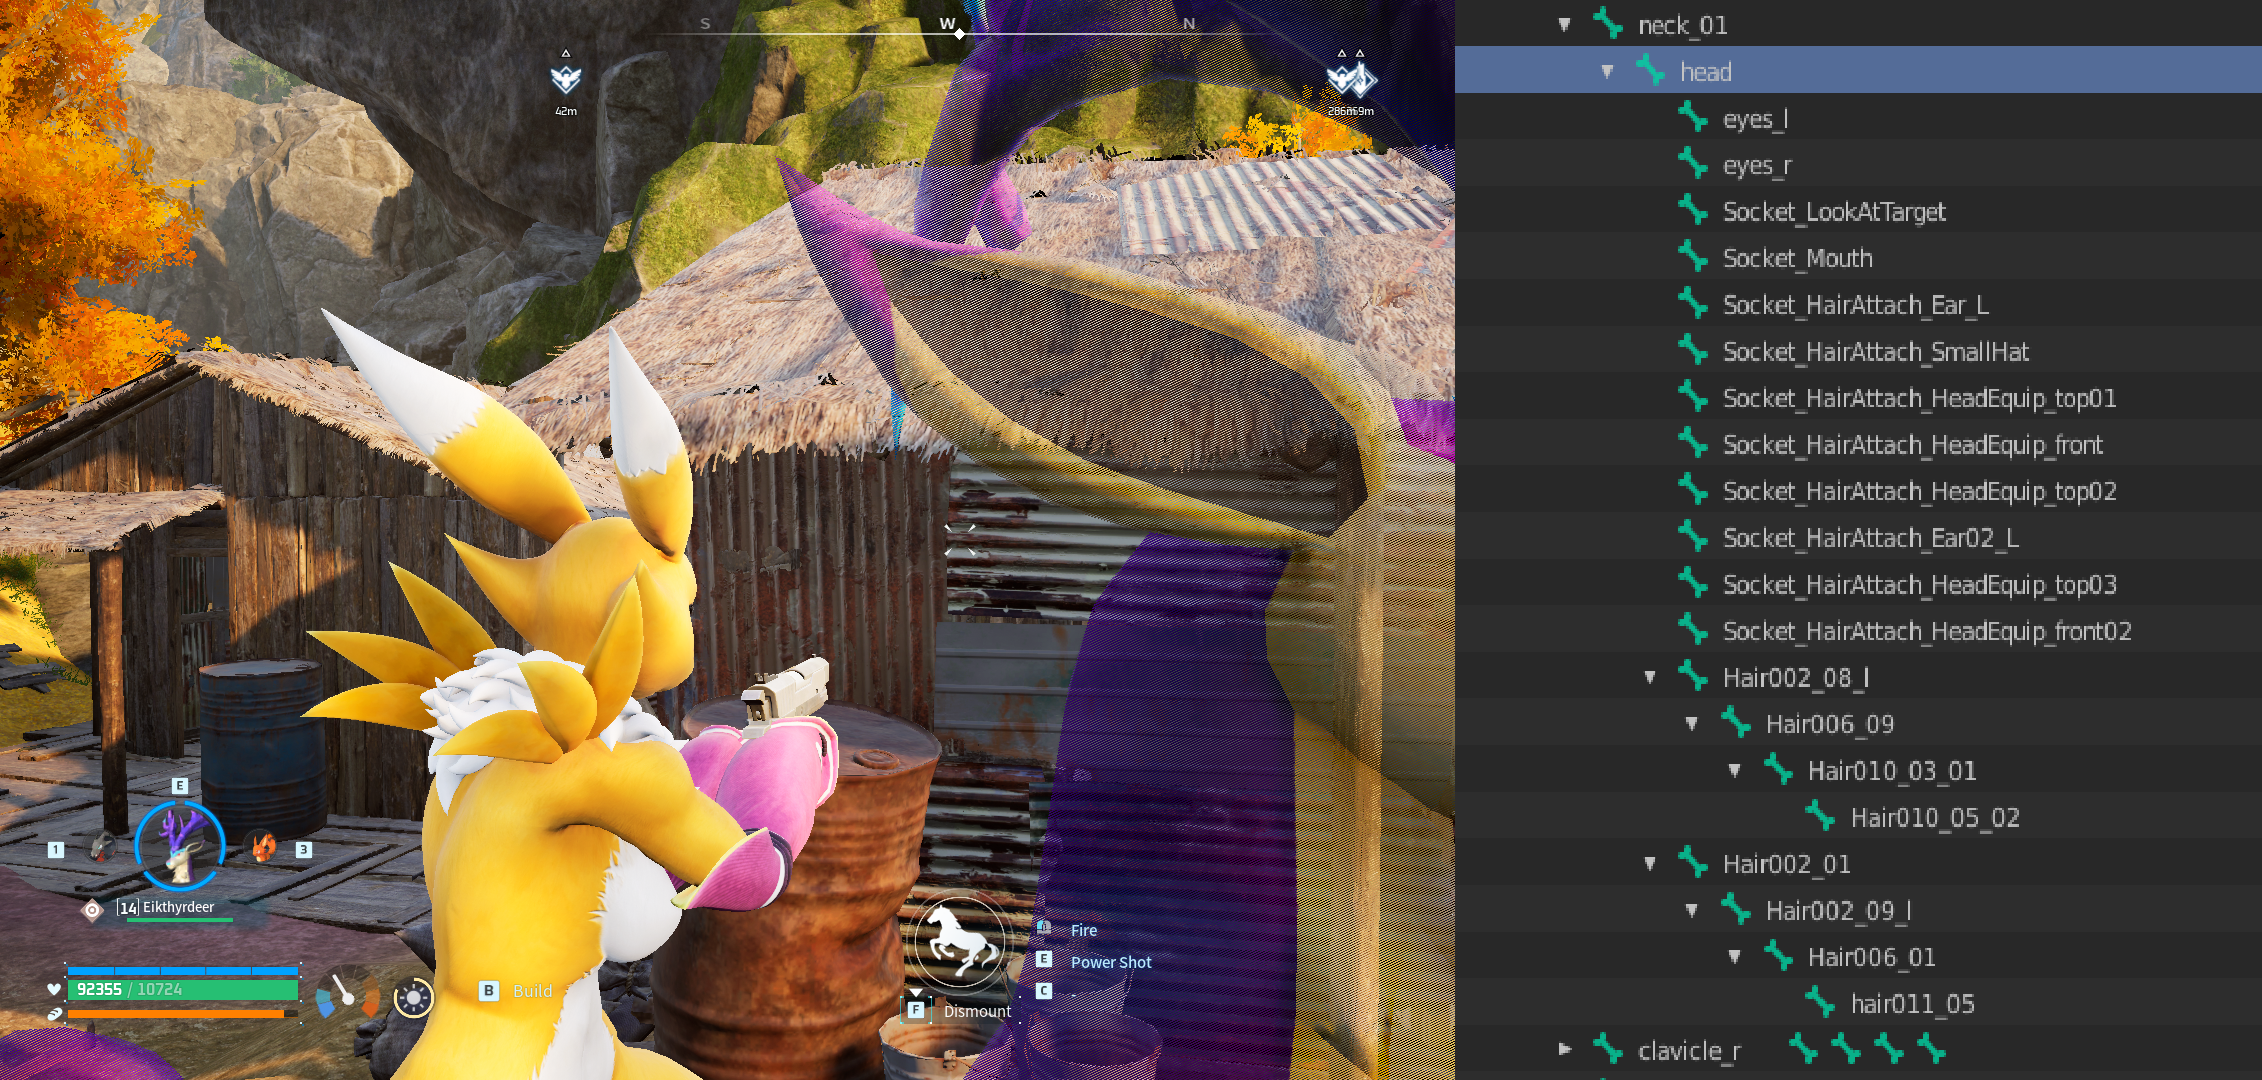
- There is an in game bug regarding Mounted Combat that needs to be worked around at this point or it will affect everything from here on.
SEE IMAGE 18- Any Custom added bones Above the Waist will error when aiming side to side while mounted. This has something to do with the animation lock of the root bone.
- To Fix. all above waist added bones must use names of existing in game bones that are not being used by the Outfit Swap.
- All the Hair bones can be used to fix this
SEE IMAGE 19- List of Hair Bones compiled and provided by
BackwoodsBeastfrom the Palworld Modding Community Discord
- List of Hair Bones compiled and provided by
- All the Hair bones can be used to fix this
- This bug persists on anything with applied physics even if not using Kawaii. ie. spring controllers for jiggle physics
- I recommend repurposing the backpack bones as weight paint for breasts
| Reference File Name/Description | Reference File |
|---|---|
Image_18 - Mounted_Bug Shows the Bug of using custom bones while in mounted combat Notice the bone tree items marked RenaEar Even though im facing left of the mount |
|
Image_19 - Mounted_Bug_Fix The fix Using the exxact same bones Only difference if you look at the tree |
|

Step 3 _ (Blender) - Dividing up the Model
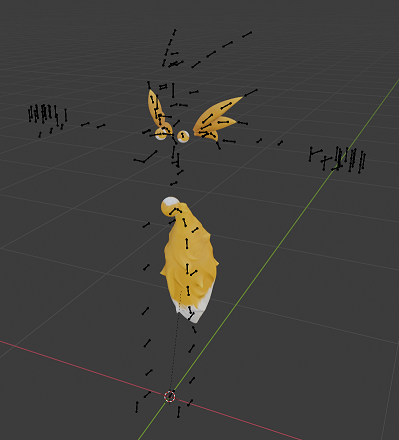
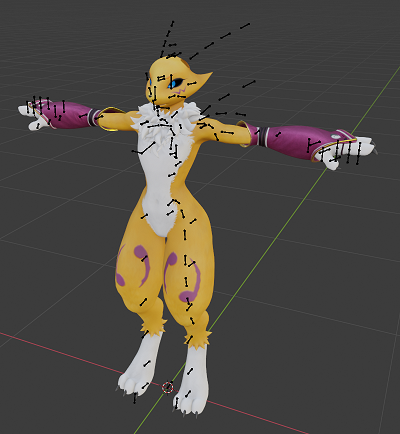
- You now need to split your model into the Necessary Parts that are going to be your Outfit Swap, Head Swap, and Hair Swap.
- For my exaple the Ears are a Hair Swap, The Tail and Back spikes are a Head Swap, and Everything else is an Outfit Swap
- Keep in mind that some helmets overwrite the hair, so if you dont want your Hair Swap to disappear in those instances you can combine the Hair Swap and Head Swap into just a Head Swap.
- Keep in mind you only need to separate the meshes but everything can stay attached to the same Armature
SEE IMAGES 03, 04, and 05- I added small spheres onto the connection bone as i occasionally had a bone error on importing to UE but it was not consistent. Those spheres stopped it completely.
- Export these as 3 separate FBX files with the armature in each one. just like the images.
| Reference File Name/Description | Reference File |
|---|---|
Image_03 - Hair_FBX This shows the active parts for the Hair Swap Ensure you armature is named Armature |
|
Image_04 - Head_FBX This shows the active parts for the Head Swap Ensure you armature is named Armature |
|
Image_05 - Outfit_FBX This shows the active parts for the Outfit Swap Ensure you armature is named Armature |
|
Step 4 _ (UE) - Import Setup
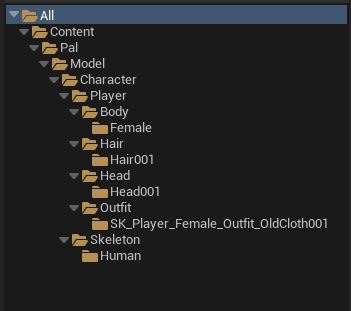
- UE folder setup is the same as any normal model swap as well as all your cooking settings
SEE IMAGE 06- I am only doing an Outfit Swap of the Old Cloth in this example, If you're doing other outfits then you'll need those too.
- note that the Hair Swap and Head Swap can be done with any head and hair, not just 001 as i am showing here
| Reference File Name/Description | Reference File |
|---|---|
Image_06 - File_Structure The Standard Model Swap file structure More or Differnt Folders may be required for your specific swap Adjust as required |
|
Step 5 _ (UE) - Import Outfit FBX
- Standard model swap applies here
- Import your FBX into the folder
SK_Player_Female_Outfit_OldCloth001- Rename
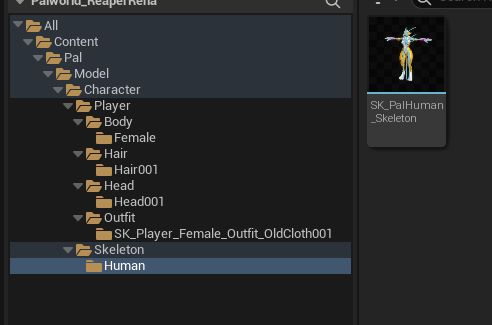
SkeletontoSK_PalHuman_Skeleton, and move to the Human FolderSEE IMAGE 07 - Rename
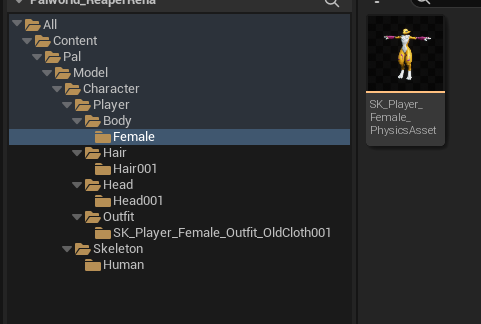
Physics AssettoSK_Player_Female_PhysicsAsset, and move to the Female FolderSEE IMAGE 08 - Rename
Skeletal MeshtoSK_Player_Female_Outfit_OldCloth001SEE IMAGE 09
- Rename
- Renaming materials and Textures is up to you, or may depend on what kind of swap you are doing
- If you have more outfits, rename and relink skeleton and physics asset as necessary.
- Optional set up of
Kawaii Collision Asset- Right click on the
Skeletal Meshand Create anAnimation Blueprint- You may already have one if jiggle physics are enabled
- Use this model to create the
Collision Assetas you can see all collidable entities- I wont go into detail on this as its quite involved but I will link a very informative Video at the end of this for how to do it.
- Experiment with your Collision objects as you need.
SEE IMAGE 20for sample
- I wont go into detail on this as its quite involved but I will link a very informative Video at the end of this for how to do it.
- If you dont set up the
Collision Assetthe physics will still work, they just may clip with your model
- Right click on the
| Reference File Name/Description | Reference File |
|---|---|
Image_07 - Outfit_Skeleton_Location Shows the Location of the Ensure the name of your file matches |
|
Image_08 - Outfit_PA_Location Shows the Location of the Ensure the name of your file matches |
|
Image_09 - Outfit_Mesh_Location Shows the Location of the Ensure the name of your More or Differnt Folders may be required for your specific swap |
|
Image_20 - Kawaii_Sample Shows a sample of the This collision specific for stopping the tail from clipping with the legs Second image shows how it looks pulled into the other swaps after setup |
|

Step 6 _ (UE) - Import Hair FBX
- Import your FBX into the folder Hair001
- Rename
Skeletal MeshtoSK_Player_Hair001
- Rename
- Renaming anything else is up to you
- Right click on the
Skeletal Meshand Create anAnimation Blueprint - Open the
Physics Assetthat was auto generated upon import- We dont need anything here as it will be controlled by Kawaii
- Delete everything under the skeleton tree
- Save and Close
Possible that setting this up further will add collision between the hair and the world around, needs more testing
- We dont need anything here as it will be controlled by Kawaii
- Open the
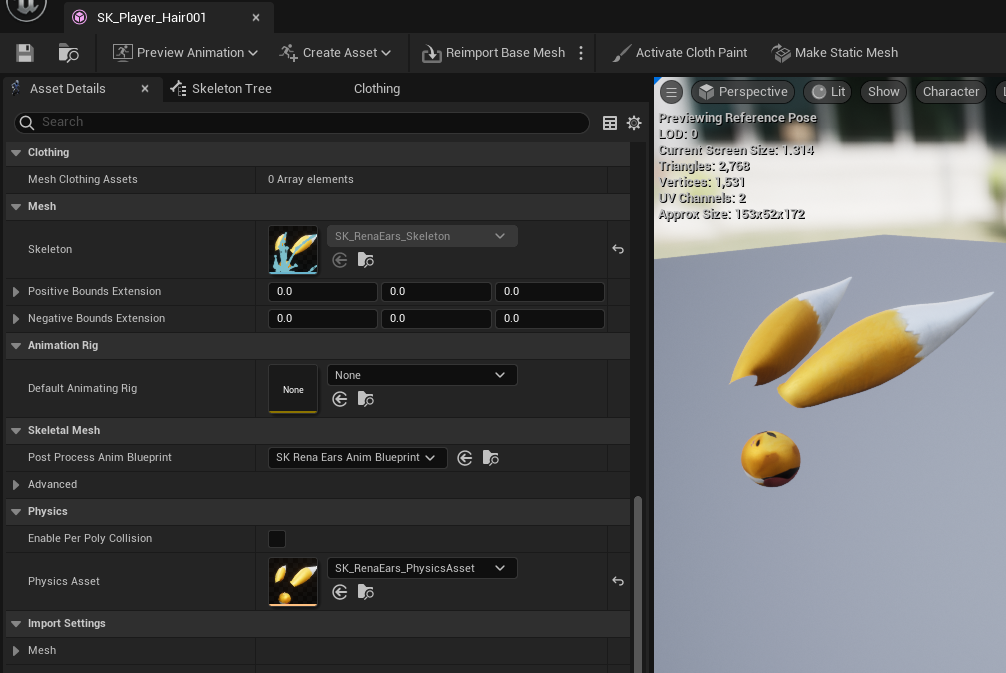
Skeletal Mesh- under the
Asset DetailsTab, Scroll down until you find thePost Process Anim Blueprintand set it to the one you just CreatedSEE IMAGE 10
- under the
- Open the
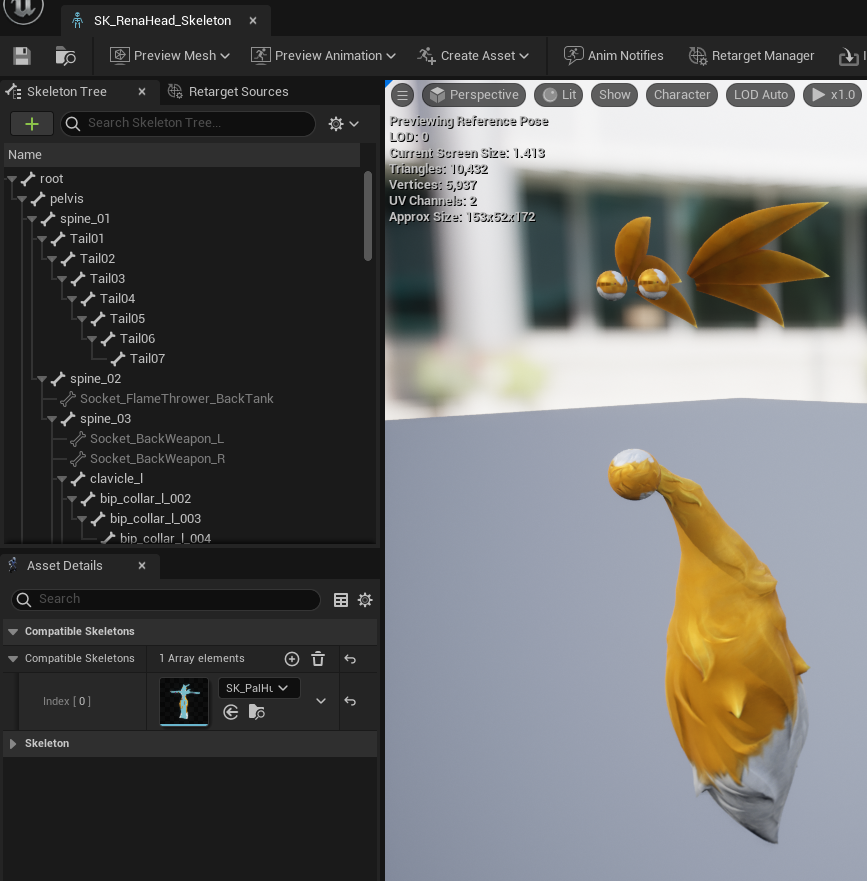
Skeleton- Under the
Asset DetailsTab, Add aCompatible Skeletonand set it to theSK_PalHuman_Skeletonfrom the Outfit FBXSEE IMAGE 11- IMPORTANT This tab might be hidden by default for you, click on Window on the top bar to turn it on
- If you would like helmets to be visible with your swap then you need to add replacement Skeletal Sockets to the head bone
- Relative Position of these sockets can be found using FModel however may need adjustment specific to your model
- Socket_HairAttach_HeadEquip_top01
- Controls the following Helmets: Monarch's Crown, Golden Crown, Graduation Cap, Witch's Crown (Ultra)
- Socket_HairAttach_HeadEquip_top02
- Controls the following Helmets: Long-eared Headband
- Socket_HairAttach_HeadEquip_top03
- Controls the following Helmets: Silk Hat
- Socket_HairAttach_HeadEquip_front
- Controls the following Helmets: Metal Helm, Refined Metal Helm, Pal Metal Helm
- Socket_HairAttach_Ear02_L
- Controls the following Helmets: Feathered Hair Band
- Not Controlled by Sockets in the Hair as they replace the Hair when equipped
- Following helmets: Soft Hat, Tocotoco Cap, Grinning Tocotoco Cap, Farming Hat, Tricorne, Helmet, Bowler Hat, Gumoss Cap, Penking Cap, Katress Cap, Witch Hat
- IMPORTANT Equipping any of these will hide the entire Kawaii Hair File and add a small Hair effect linked to the model
- Socket_HairAttach_HeadEquip_top01
- Relative Position of these sockets can be found using FModel however may need adjustment specific to your model
- Under the
- Open the
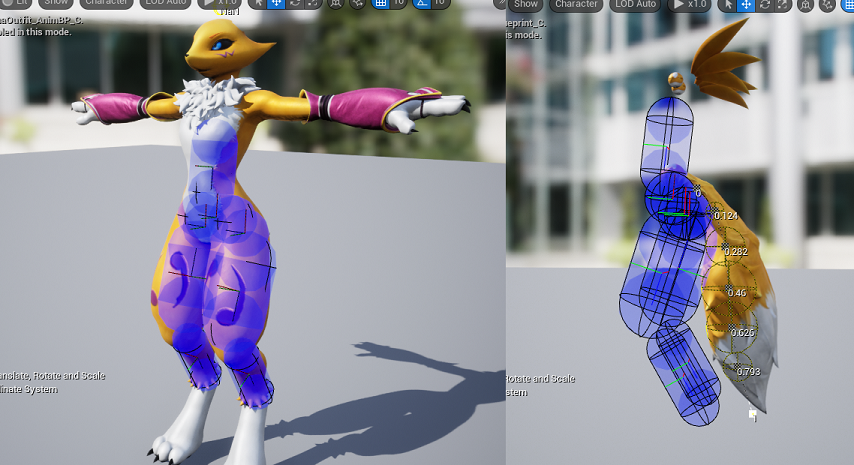
Animation Blueprint- Set up your Kawaii physics and Collision.
SEE IMAGE 12- I wont go into detail on this as its quite involved but I will link a very informative Video at the end of this for how to do it.
- Experiment with your settings as you need.
- I wont go into detail on this as its quite involved but I will link a very informative Video at the end of this for how to do it.
- Set up your Kawaii physics and Collision.
SEE IMAGE 13 FOR FINALIZED FOLDER
| Reference File Name/Description | Reference File |
|---|---|
Image_10 - Hair_SkeletalMesh Shows the Opened Under Set the |
|
Image_11 - Hair_Skeleton Shows the Opened Under Set the |
|
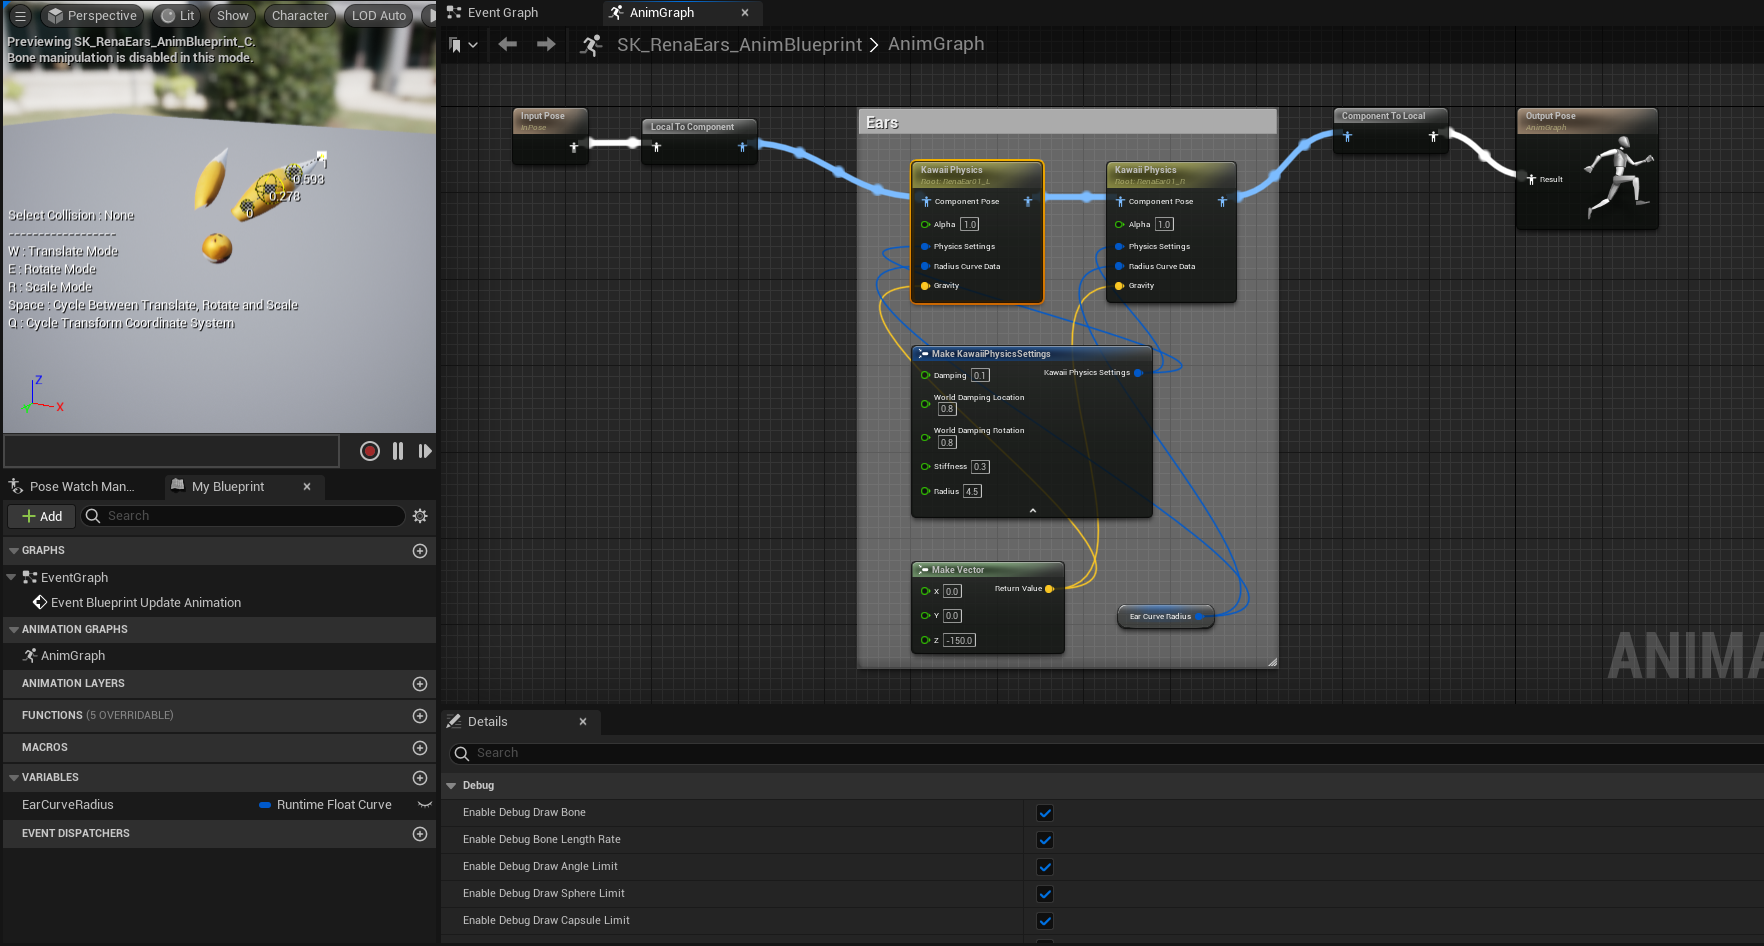
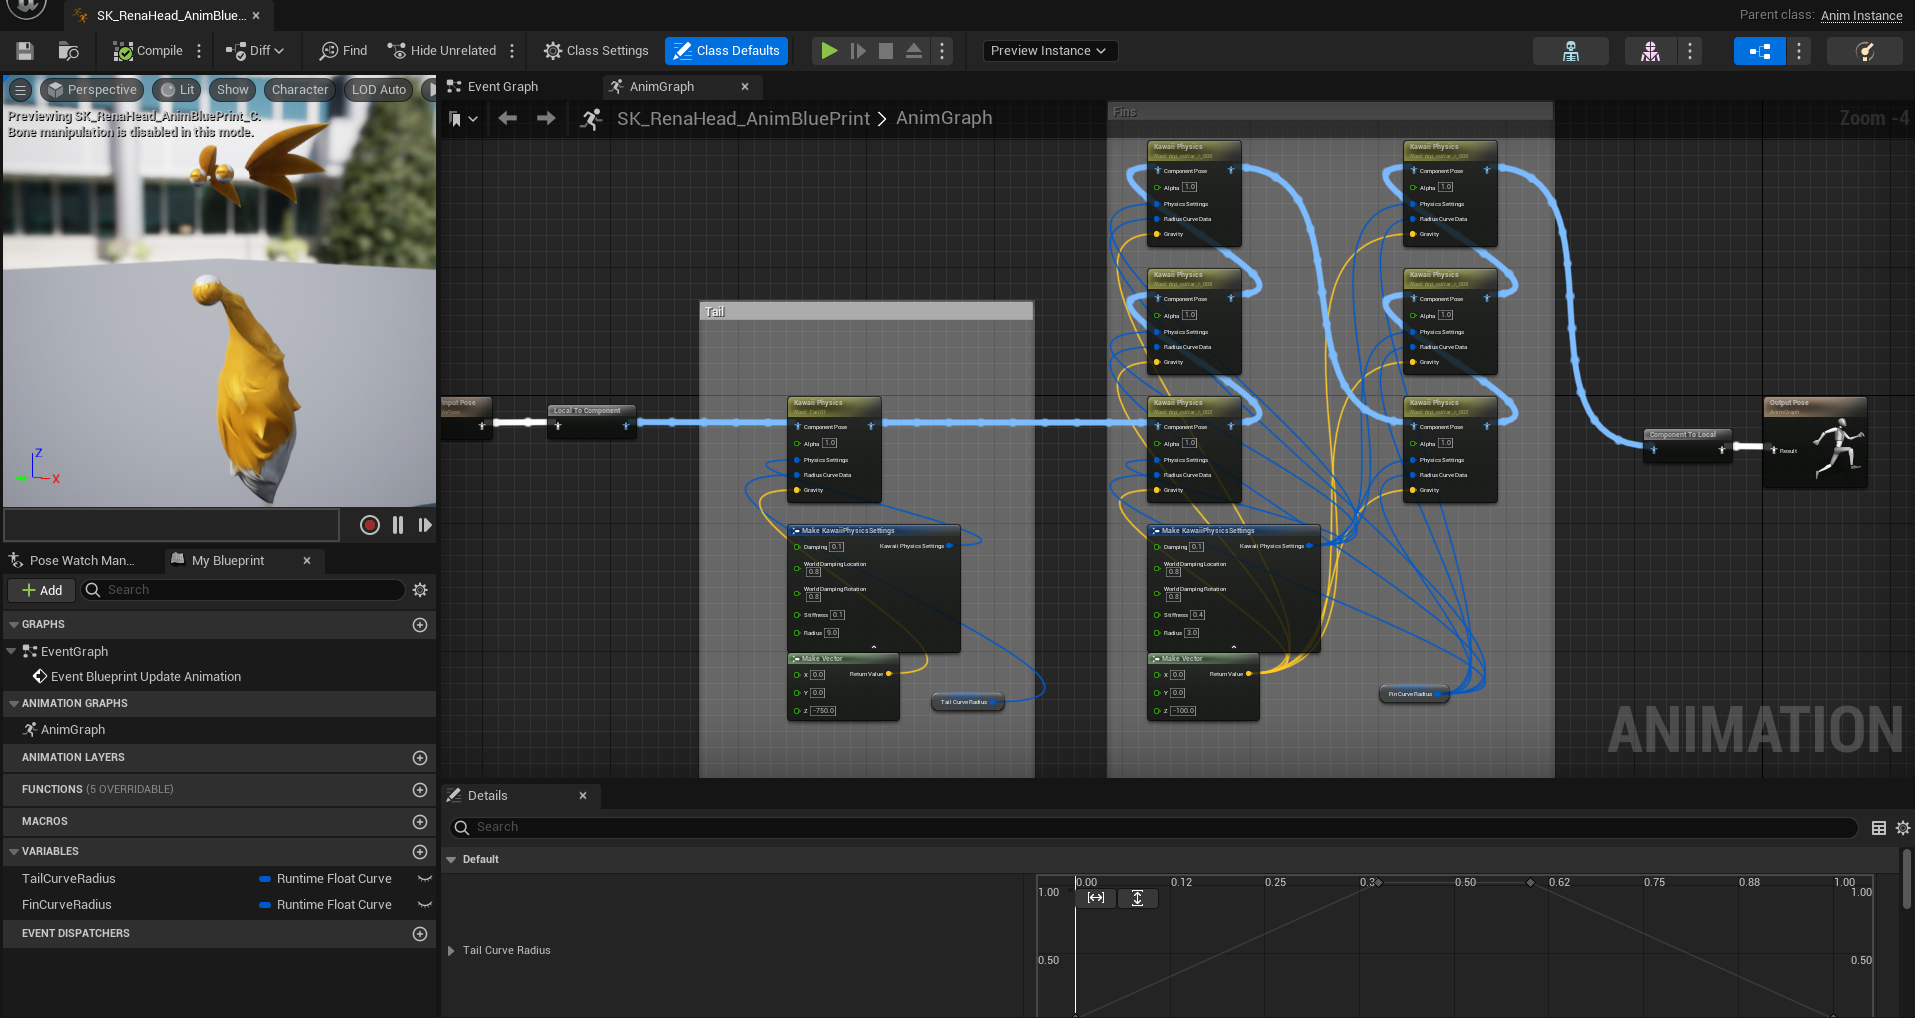
Image_12 - Hair_AnimBP Shows the Opened use the Kawaii Video Guide for setting up Show values are an example |
|
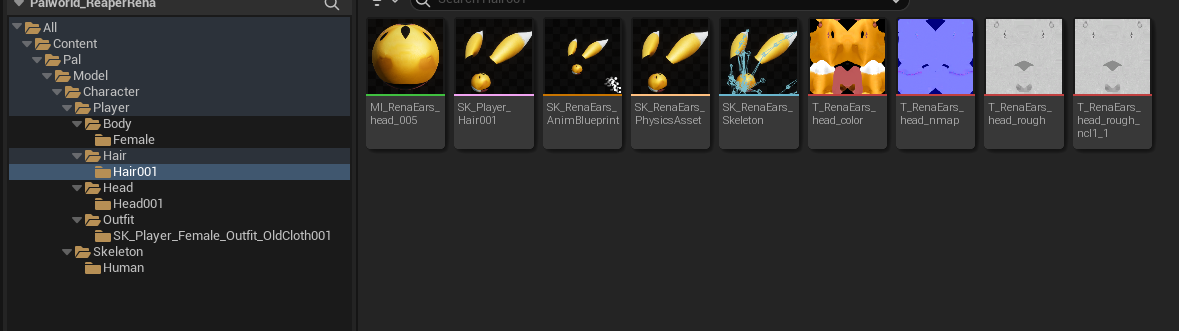
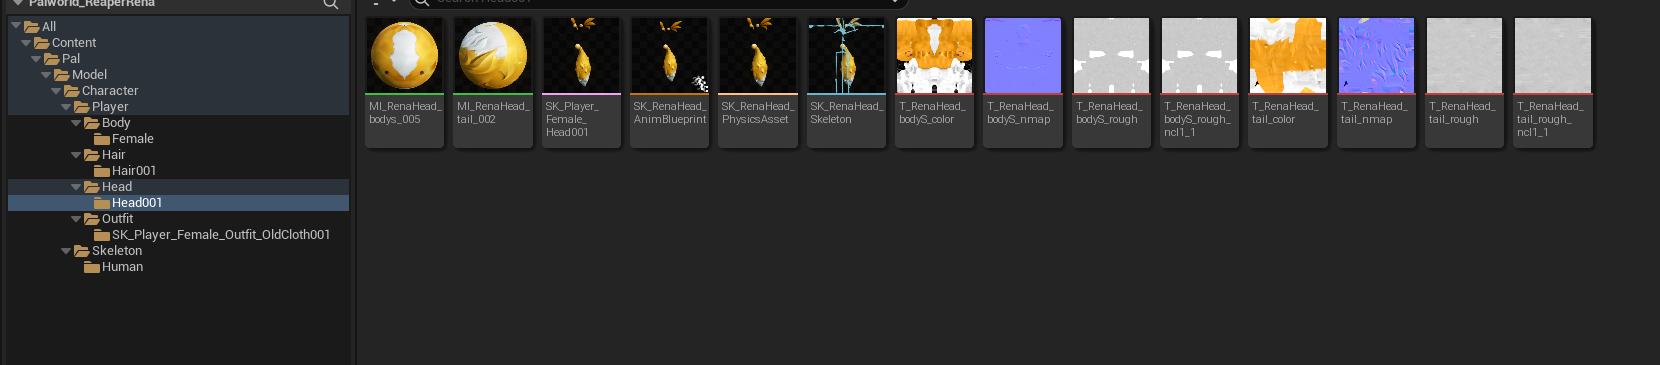
Image_13 - Hair_Folder Shows a final version of the set up Hair Folder |
|
Step 7 _ (UE) - Import Head FBX
- Import your FBX into the folder Head001
- Rename
Skeletal MeshtoSK_Player_Female_Head001
- Rename
- Renaming anything else is up to you
- Right click on the
Skeletal Meshand Create anAnimation Blueprint - Open the
Physics Assetthat was auto generated upon import- We dont need anything here as it will be controlled by Kawaii
- Delete everything under the skeleton tree
- Save and Close
Possible that setting this up further will add collision between the head parts and the world around, needs more testing
- We dont need anything here as it will be controlled by Kawaii
- Open the
Skeletal Mesh- under the
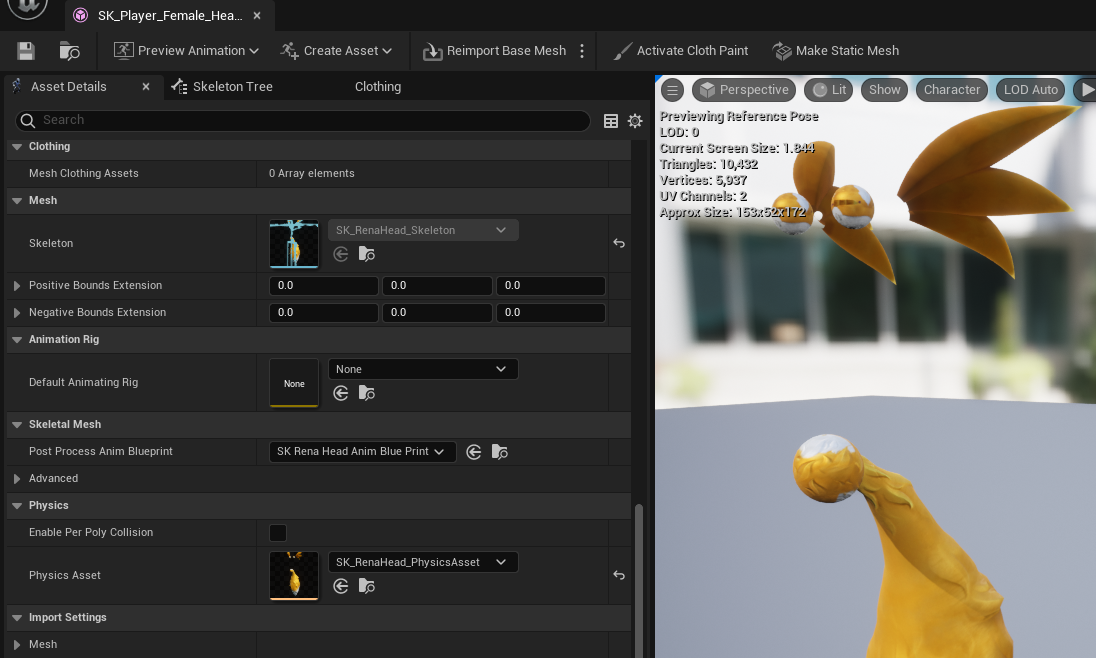
Asset DetailsTab, Scroll down until you find thePost Process Anim Blueprintand set it to the one you just CreatedSEE IMAGE 14
- under the
- Open the
Skeleton- Under the
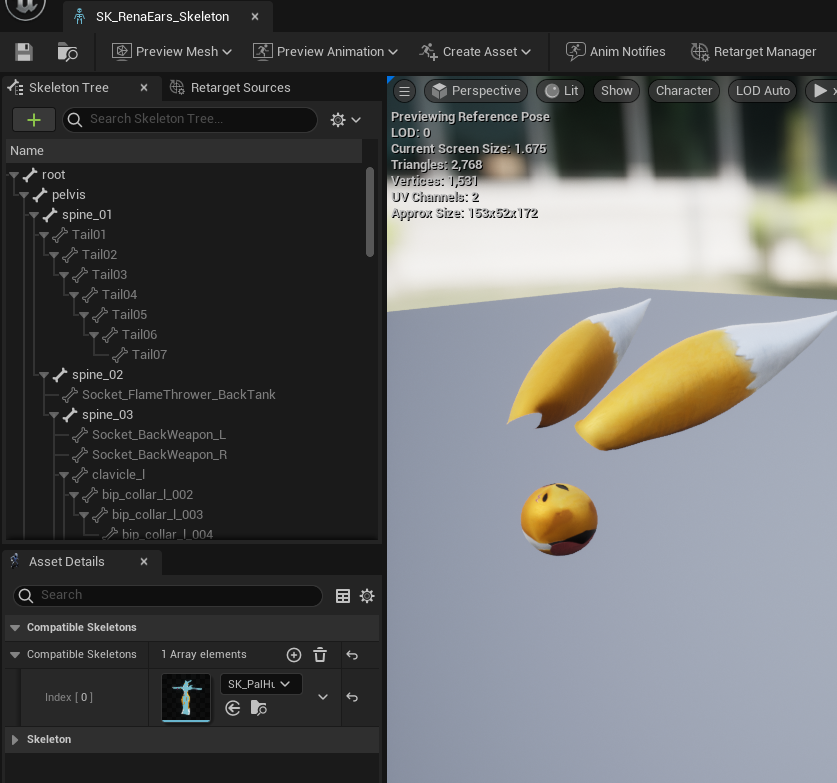
Asset DetailsTab, Add aCompatible Skeletonand set it to theSK_PalHuman_Skeletonfrom the Outfit FBXSEE IMAGE 15- IMPORTANT This tab might be hidden by default for you, click on Window on the top bar to turn it on
- Under the
- Open the
Animation Blueprint- Set up your Kawaii physics and Collision.
SEE IMAGE 16- I wont go into detail on this as its quite involved but I will link a very informative Video at the end of this for how to do it.
- Experiment with your settings as you need.
- I wont go into detail on this as its quite involved but I will link a very informative Video at the end of this for how to do it.
- Set up your Kawaii physics and Collision.
SEE IMAGE 17 FOR FINALIZED FOLDER
| Reference File Name/Description | Reference File |
|---|---|
Image_14 - Head_SkeletalMesh Shows the Opened Under Set the |
|
Image_15 - Head_Skeleton Shows the Opened Under Set the |
|
Image_16 - Head_AnimBP Shows the Opened use the Kawaii Video Guide for setting up Show values are an example |
|
Image_17 - Head_Folder Shows a final version of the set up Hair Folder |
|
Step 8 - Finishing Touches
- From here most everything is the same as a normal model swap so i will only go over it quickly and call attention to things that need it
- Cook like normal
- Copy into your Pak file structure and remove the
skeletonin the Human folder, and thePhysics assetin the Female Folder- CRITICAL The skeleton and assets in the Head001 folder and Hair001 folder must STAY in the Pak
- Use UnrealPak to make your Pak file
- Drop into your game files
Step 9 - Finish
- Enjoy a model swap with Kawaii Physics and Collision. Thats it
![]()